
JP-8080 guide / Chapter 17
Studio Programming Workflow
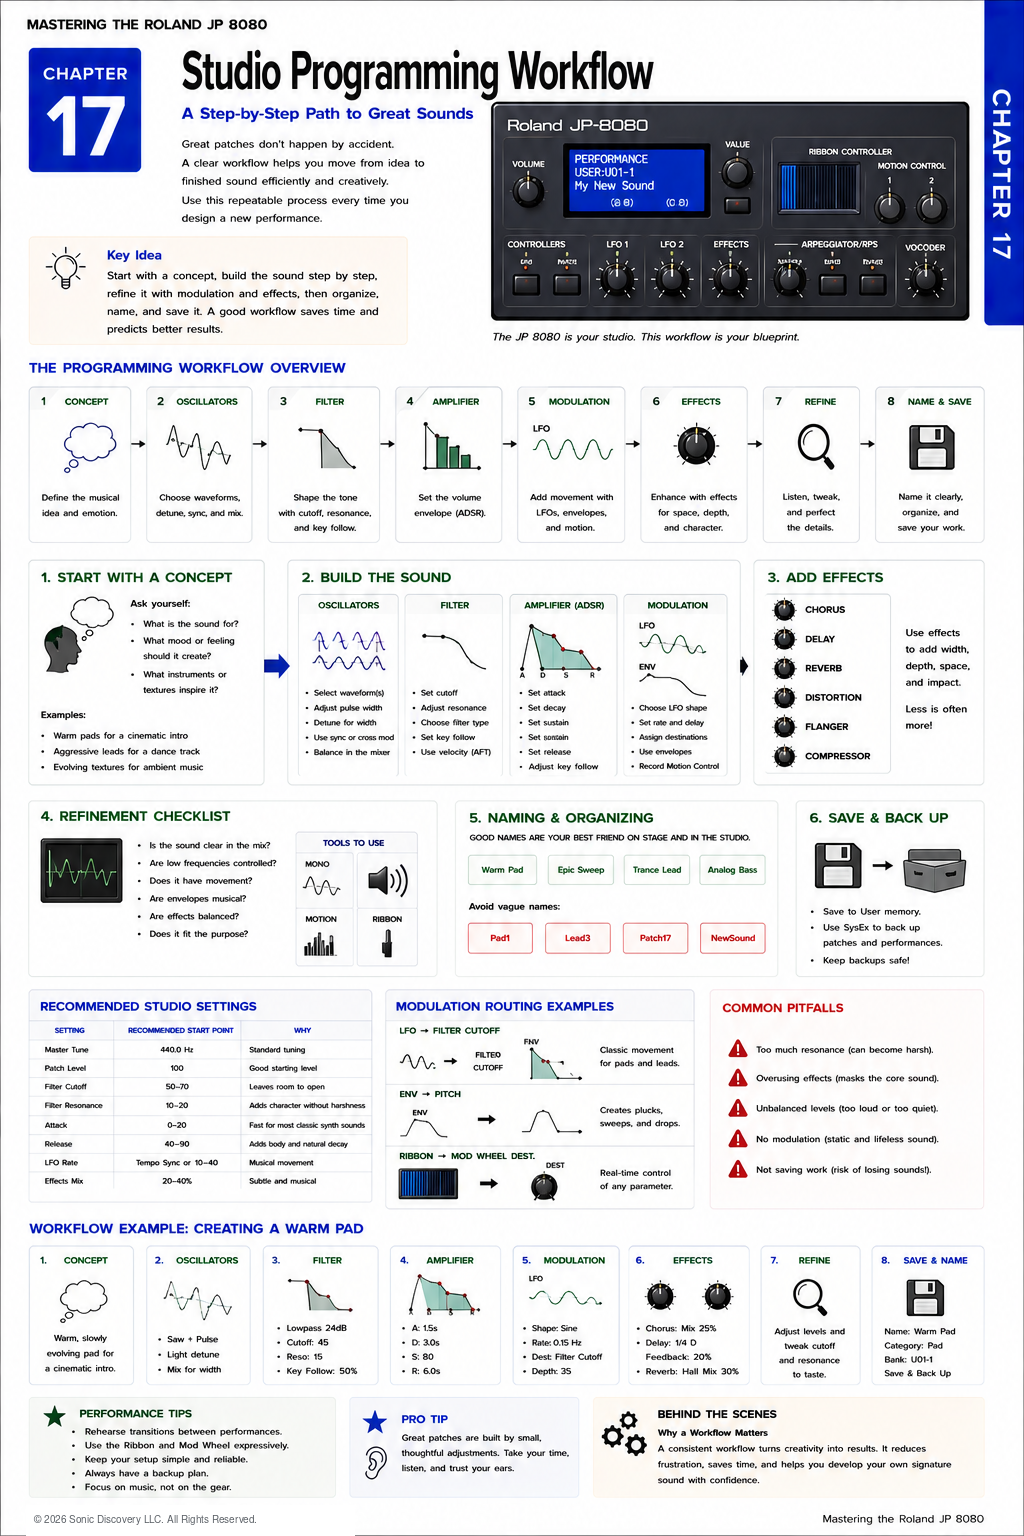
A repeatable path from concept and oscillators through refinement, naming, saving, and backup.
Chapter 17
Great sounds are rarely discovered by accident. They are built one thoughtful decision at a time.
Every synthesizer programmer eventually develops a personal workflow. Some begin with the Oscillators. Others start with the Filter. Some add effects immediately, while others leave them until the very end.
After years of programming, most experienced sound designers arrive at the same conclusion: a consistent workflow produces better results.
The Roland JP-8080 offers a remarkably intuitive front panel that encourages experimentation, but having a structured approach allows you to move from an idea to a polished Patch more efficiently and with fewer distractions.
This chapter presents a repeatable programming method that can be applied to nearly any type of sound, whether you are designing a bass, lead, pad, string ensemble, sound effect, or evolving ambient texture.
The exact settings will change from Patch to Patch. The workflow remains largely the same.
Begin with a Musical Goal
Before touching a single control, ask yourself one simple question: What do I want this Patch to do?
Avoid thinking in terms of synthesizer parameters. Instead, think musically. Your goal might be a warm analog Pad, aggressive trance Lead, vintage Brass, punchy Bass, evolving texture, or expressive solo voice.
Having a clear destination prevents aimless editing. The synthesizer becomes a tool for achieving a musical objective rather than a collection of knobs.
Step One: Initialize the Patch
Whenever possible, begin with an initialized Patch. Starting from a neutral sound removes unexpected modulation and hidden parameter changes left over from previous programming.
An initialized Patch allows you to hear the effect of every adjustment you make. You are building from a clean foundation.
Step Two: Build the Core Tone
The Oscillator section is the foundation of every Patch. Choose the waveform that best matches your musical goal.
| Waveform | Character | Useful for |
|---|---|---|
| Saw | Bright and harmonically rich | Leads, Pads, Brass, and Strings |
| Square | Strong odd harmonics | Hollow Leads, vintage synthesizer sounds, and pulse width modulation |
| Triangle | Smooth and gentle | Soft Pads, flute like tones, and supporting Layers |
| Noise | Textured and nonpitched | Percussion, wind, attack transients, and special effects |
At this stage, avoid adding modulation. Simply establish the basic tonal character.
Step Three: Shape the Tone
Once the Oscillators sound correct, move to the Filter. Rather than asking, “What cutoff value should I use?” ask, “Should this sound be brighter or darker?”
Adjust Cutoff Frequency, Resonance, and Key Follow. Small changes often produce significant musical differences. The Filter is one of the most expressive sections of the synthesizer.
Step Four: Shape the Volume
Now adjust the Amplifier Envelope. The four ADSR stages determine how the sound behaves over time.
Ask whether the sound should start immediately, fade in slowly, or continue after releasing the key. At this stage, ignore movement and establish the basic playing response.
Step Five: Shape the Filter Envelope
Many beginners overlook the Filter Envelope. In reality, it often provides much of the personality of the Patch.
| Envelope behavior | Musical character |
|---|---|
| Fast Attack | Classic Synth Brass |
| Long Attack | Ambient Pad |
| Short Decay | Punchy Bass |
| Long Release | Dreamlike textures |
The interaction between the Filter Envelope and Amplifier Envelope largely defines how expressive the Patch feels.
Step Six: Add Movement
Only after the sound feels musically complete should you begin adding modulation.
Possible sources include the LFO, Motion Control, Ribbon Controller, Velocity, Aftertouch from an external controller, and Modulation Wheel.
Movement should support the sound rather than distract from it. Subtle modulation often sounds more realistic than dramatic modulation.
Step Seven: Add Effects
Effects should enhance an already strong Patch. Consider Chorus for width, Delay for depth, Reverb for space, Distortion for character, Phaser for motion, or Flanger for texture.
Step Eight: Refine
Now spend time listening. Play softly and loudly. Play high and low notes. Listen in mono and stereo. Play with accompaniment and alone.
Small adjustments at this stage often make the greatest difference. Professional programming frequently involves refinement rather than dramatic changes.
Step Nine: Compare
Before saving, compare your Patch with similar sounds.
- Does it achieve the original musical goal?
- Is it balanced?
- Does it cut through the mix?
- Is it too bright or too dark?
- Is it too loud or too subtle?
Comparisons reveal details that are difficult to notice when listening to a single sound in isolation.
Step Ten: Name and Save
A carefully programmed Patch deserves a meaningful name. Avoid generic titles such as “Patch 32.” Choose descriptive names such as Warm Cinema Pad, Vintage PWM Lead, Crystal Atmosphere, JP Analog Brass, Soft Choir, or Trance Pulse.
Save the Patch to User memory. Then update any Performances that use this Patch if appropriate.
Remember that editing a Patch inside a Performance does not automatically update the standalone User Patch unless you intentionally write it to Patch memory.
The Programming Workflow
Following the same sequence each time helps develop consistency and confidence.
| Step | Stage | Purpose |
|---|---|---|
| 1 | Musical Goal | Define what the Patch should accomplish |
| 2 | Initialize Patch | Begin from a clean foundation |
| 3 | Oscillators | Establish the core tone |
| 4 | Filter | Shape brightness and harmonic focus |
| 5 | Amplifier Envelope | Define the volume response |
| 6 | Filter Envelope | Add tonal movement and personality |
| 7 | Modulation | Add expressive motion |
| 8 | Effects | Enhance the finished core sound |
| 9 | Refinement | Listen, compare, and correct details |
| 10 | Name and Save | Organize and preserve the finished Patch |
Practical Example
Creating a Warm Analog Pad
| Stage | Programming choice | Reason |
|---|---|---|
| Goal | Warm cinematic Pad | Defines the musical destination |
| Oscillator | Saw waveform with slight Detune | Creates a rich and gently widened foundation |
| Filter | Low Pass Filter with moderate Cutoff | Softens the brightness |
| Amplifier | Long Attack | Creates a gradual fade in |
| Filter Envelope | Gentle movement | Adds evolving tonal character |
| Modulation | Slow Triangle LFO on Filter | Provides subtle continuous motion |
| Effects | Light Chorus and Hall Reverb | Adds width and acoustic space |
| Finish | Refine and save as Warm Cinema Pad | Completes and organizes the Patch |
Every decision follows logically from the previous one.
Listen for It
- Load an initialized Patch.
- Spend five minutes programming only the Oscillators and Filter.
- Do not touch the Effects.
- Save the Patch.
- Reload the initialized Patch and immediately add Chorus, Delay, and Reverb before programming the Oscillators.
- Compare the results.
Most programmers discover that the first approach produces a stronger, more focused sound because the foundation was established before enhancement.
Try It
- Decide on a musical goal.
- Initialize the Patch.
- Select the Oscillator waveform.
- Shape the Filter.
- Program the Amplifier Envelope.
- Program the Filter Envelope.
- Add one LFO.
- Add one Effect.
- Refine the Patch.
- Name and save it.
Repeat this exercise with several different sound categories. As your experience grows, the process becomes faster and more intuitive.
Common Mistake
Many beginning programmers jump rapidly between unrelated controls, moving from Oscillator to Reverb, then LFO, Resonance, Delay, and back to Oscillator.
This makes it difficult to understand which change improved the sound. Work methodically. Finish one section before moving to the next.
Programming Tip
When programming for long periods, take short listening breaks. Our ears gradually adapt to bright sounds, loud levels, and heavy effects.
Returning after a brief pause often reveals problems that were previously unnoticed. Fresh ears are one of the most valuable tools in sound design.
Behind the Scenes
Why does a structured workflow matter?
Roland designed the JP-8080 with a dedicated control for nearly every major synthesis parameter. Unlike synthesizers that rely heavily on menus, the JP-8080 encourages direct interaction with the sound.
This immediacy makes experimentation enjoyable, but it can also tempt programmers to change many parameters at once.
A disciplined workflow turns that abundance of controls into an advantage. Each section of the synthesizer builds logically on the previous one, making it easier to understand cause and effect.
Over time, this approach develops intuition, allowing you to hear a sound in your imagination and know exactly which controls will bring it to life.
Creative Programming Exercises
| Exercise | Goal | Primary focus |
|---|---|---|
| Vintage Brass | Create a warm analog Brass sound using only one Oscillator before introducing Layers or Effects | Filter Envelope and Amplifier Envelope |
| Ambient Pad | Create movement without using the Arpeggiator | Slow LFO, Motion Control, and Chorus |
| Modern Dance Lead | Design a Lead that cuts through a dense mix | Supersaw Oscillator, moderate Resonance, Delay, and careful level balancing |
| Minimal Programming | Create the best possible Patch using one Oscillator, one Filter, and one Envelope | Achieving more with simple programming before relying on additional features |
Chapter Summary
- Begin every Patch with a clear musical goal.
- Whenever practical, start from an initialized Patch.
- Build the sound in logical stages.
- Program Oscillators before Filters.
- Program Filters before modulation.
- Add Effects only after the core sound is complete.
- Refine by listening in different musical contexts.
- Compare your Patch with similar sounds.
- Give every finished Patch a meaningful name.
- Save your work and update related Performances when necessary.
- A consistent workflow produces more predictable and professional results than random experimentation.
Looking Ahead
In Chapter 18, Programming Recipes, we shift from theory to application. Each recipe presents a complete sound design project, beginning with a musical goal and progressing through every major programming decision.
Rather than simply listing parameter values, you will learn why each setting contributes to the final result. These recipes are intended not only to recreate classic synthesizer sounds, but also to teach the principles that will help you design your own original Patches with confidence.