
JP-8080 guide / Chapter 18
Programming Recipes
Warm pad, supersaw lead, vintage brass, glassy bell, strings, and other useful starting points.
Chapter 18
Every great Patch tells a story. The goal is not to copy a sound, but to understand how it was created.
Throughout this handbook, we have explored every major section of the Roland JP-8080, from the Oscillators and Filters to Motion Control, Effects, MIDI, and Performance mode. You now understand the purpose of each building block.
This chapter brings those building blocks together.
Rather than presenting a list of parameter values to copy, each recipe explains the reasoning behind the programming choices. As you work through these examples, begin asking yourself not only what each control does, but why it contributes to the final sound.
Once you understand the “why,” you will be able to create your own original sounds with confidence.
Programming Strategy
Every recipe in this chapter follows the same workflow.
- Define the musical goal.
- Choose the Oscillator.
- Shape the sound with the Filter.
- Program the Envelopes.
- Add Modulation.
- Apply Effects.
- Refine and save the Patch.
Following a consistent process allows you to understand how each programming decision contributes to the finished sound.
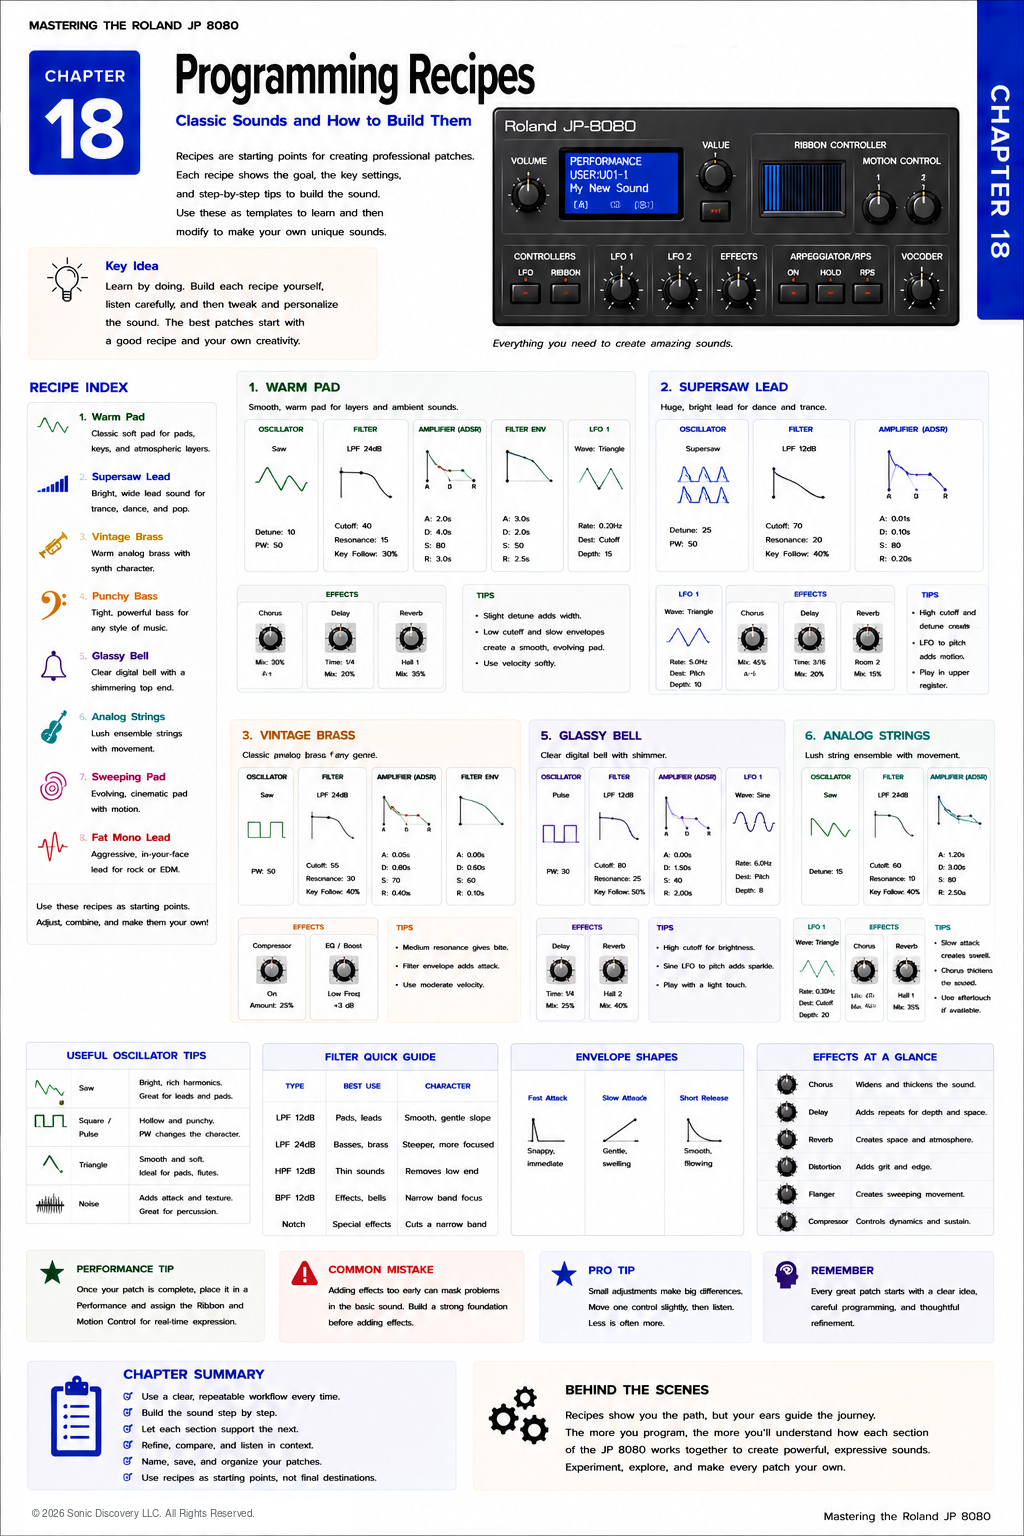
Recipe One: Classic Trance Supersaw
Musical goal
Create a wide, energetic Lead suitable for uplifting trance and electronic dance music.
| Section | Starting point | Purpose |
|---|---|---|
| Oscillators | Select the Supersaw waveform and use moderate Detune. | The Supersaw already contains multiple virtual oscillators. Avoid excessive Detune because too much spread reduces focus in a full mix. |
| Filter | Choose a Low Pass Filter, keep the Cutoff fairly open, and add only a small amount of Resonance. | Preserves brightness without harshness. |
| Amplifier Envelope | Very fast Attack, moderate Decay, high Sustain, and medium Release. | Creates a responsive Lead while maintaining smooth note transitions. |
| Filter Envelope | Use a gentle positive envelope amount. | The slight opening movement gives the sound extra energy at the beginning of each note. |
| LFO | Assign a slow Triangle LFO to Pitch and keep the depth subtle. | Creates a gentle analog style vibrato rather than an obvious pitch wobble. |
| Effects | Chorus, tempo synchronized Delay, and Hall Reverb. | Chorus enhances width, Delay creates rhythmic space, and Reverb adds depth without masking articulation. |
Why it works
The Supersaw already produces a rich harmonic spectrum. The Filter preserves brightness while controlling excessive high frequencies. Chorus reinforces the layered character, while Delay adds excitement between phrases without cluttering the melody.
Recipe Two: Warm Analog Pad
Musical goal
Create a soft evolving Pad inspired by vintage Roland synthesizers.
| Section | Starting point | Purpose |
|---|---|---|
| Oscillators | Saw waveform with very slight Detune. | Creates a rich foundation with gentle width. |
| Filter | Lower Cutoff and minimal Resonance. | The darker Filter allows the Pad to sit behind other instruments. |
| Amplifier Envelope | Long Attack, high Sustain, and long Release. | The sound fades in naturally and lingers after each chord. |
| Filter Envelope | Gentle Attack with a small positive envelope amount. | Creates gradual brightness as the note develops. |
| LFO | Assign a slow Triangle LFO to Filter Cutoff. | The movement should be almost imperceptible. |
| Effects | Chorus and Hall Reverb. | Chorus widens the image and Reverb creates a spacious environment. |
Why it works
Long Envelopes and gentle modulation encourage smooth transitions between chords. Nothing changes suddenly. Everything evolves gradually.
Recipe Three: Vintage PWM Lead
Musical goal
Recreate the expressive pulse width modulation sounds popular during the 1980s.
| Section | Starting point | Purpose |
|---|---|---|
| Oscillator | Square waveform with Pulse Width Modulation enabled. | Establishes the classic PWM foundation. |
| Modulation | Assign a slow Triangle LFO to Pulse Width with moderate depth. | The continuously changing pulse width creates the characteristic animated tone. |
| Filter | Moderately open with a small Resonance boost. | Retains clarity while adding emphasis. |
| Amplifier Envelope | Fast Attack and moderate Release. | Keeps the Lead responsive and expressive. |
| Effects | Light Chorus and short Delay. | Adds width and space without overwhelming the core tone. |
Why it works
Pulse Width Modulation continuously changes the harmonic structure without changing pitch. This creates the impression of multiple oscillators even when using a single waveform.
Recipe Four: Deep Analog Bass
Musical goal
Create a powerful Bass suitable for electronic and progressive music.
| Section | Starting point | Purpose |
|---|---|---|
| Oscillator | Saw waveform with no Detune. | Keeps the fundamental frequency focused. |
| Filter | Lower Cutoff, moderate Envelope Amount, and very little Resonance. | Creates a controlled and solid low end. |
| Amplifier Envelope | Instant Attack, short Decay, medium Sustain, and short Release. | Produces a tight and responsive Bass. |
| Filter Envelope | Fast Attack, fast Decay, and a small positive amount. | The quick Filter movement produces punch at the beginning of every note. |
| Effects | Very light Compression, optional subtle Distortion, and little or no Reverb. | Bass requires clarity. |
Why it works
Bass depends more on controlled dynamics than dramatic effects. A clean, focused low end translates better across different speaker systems.
Recipe Five: Dream Pad
Musical goal
Create a lush cinematic texture with continuous movement.
| Section | Starting point | Purpose |
|---|---|---|
| Oscillators | Supersaw with moderate Detune. | Creates a broad and harmonically rich foundation. |
| Filter | Low Pass Filter with medium Cutoff. | Balances warmth with clarity. |
| Amplifier Envelope | Long Attack and long Release. | Creates slow, smooth entrances and exits. |
| Modulation | Slow LFO on Filter, Motion Control recording gradual Filter movement, and Ribbon assigned to Resonance. | Provides multiple independent layers of expression and motion. |
| Effects | Chorus, long Hall Reverb, and Delay. | Adds width, depth, and a spacious tail. |
Why it works
Multiple independent sources of movement prevent the sound from feeling repetitive. Each modulation source contributes slowly, allowing the texture to evolve over time.
Programming Challenge
Now create your own recipe. Write down each part of the plan before you begin:
- Musical Goal
- Waveform
- Filter Character
- Envelope Shape
- Modulation
- Effects
- Patch Name
Following this process develops programming discipline and encourages original sound design.
Comparing Recipes
| Sound | Brightness | Movement | Effects | Best use |
|---|---|---|---|---|
| Trance Supersaw | High | Medium | Chorus, Delay, Reverb | Lead |
| Warm Pad | Low | Slow | Chorus, Reverb | Background |
| PWM Lead | Medium | Medium | Chorus | Solo |
| Analog Bass | Low | Fast Envelope | Light Distortion | Bass |
| Dream Pad | Medium | Continuous | Chorus, Delay, Reverb | Atmosphere |
Notice that no single recipe uses every available feature. Each sound includes only the programming needed to achieve its musical goal.
Listen for It
- Program the Classic Trance Supersaw recipe and play a simple melody.
- Disable the Chorus and notice how the sound becomes narrower.
- Enable the Chorus again, then disable the Delay. Listen to how the Lead loses depth and rhythmic energy.
- Disable the Reverb. Notice how the sound becomes more direct and intimate.
This exercise demonstrates how each effect contributes a unique quality without changing the underlying Patch.
Try It
- Choose one of the recipes in this chapter.
- Recreate it as closely as possible.
- Then make only one change. Increase the Filter Cutoff, slow the LFO, reduce the Chorus, or lengthen the Release.
- Play the Patch after each adjustment.
- Observe how a single parameter can significantly change the musical personality while the overall concept remains intact.
Common Mistake
Many programmers attempt to copy a factory Patch parameter by parameter without understanding why those values were chosen.
This often leads to frustration because even small differences in playing style, Effects, or monitoring can change the final result.
Instead of asking, “How can I copy this sound exactly?” ask, “What programming decisions created this character?” That question leads to lasting understanding rather than imitation.
Pro Tip
Maintain your own programming notebook. Whenever you create a Patch you enjoy, write down:
- The musical goal.
- The key programming decisions.
- The modulation sources.
- The Effects used.
- What you would improve next time.
Over months and years, this becomes a personal sound design reference that is often more valuable than a collection of factory presets.
Behind the Scenes
Why study recipes instead of memorizing settings?
Roland designed the JP-8080 as an instrument for exploration rather than simply preset playback.
The factory sounds demonstrate what is possible, but they do not explain the reasoning behind each programming choice. Recipes bridge that gap by connecting musical intent with technical implementation.
As you complete more recipes, you begin recognizing recurring design patterns.
For example, expressive Leads often share similar Envelope characteristics, cinematic Pads frequently rely on slow modulation and generous Effects, and strong Basses usually emphasize clarity over complexity.
These recurring principles become the foundation of your own programming style.
Creative Programming Exercises
Exercise One: One Waveform Challenge
Choose only a Saw waveform. Create a Bass, a Lead, a Pad, and a Brass sound. This demonstrates how much variety can be achieved through filtering and Envelopes alone.
Exercise Two: Minimal Effects
Design a Patch that sounds complete using no Effects. Afterward, add only one Effect and notice how much more meaningful that Effect becomes.
Exercise Three: Movement Without LFO
Create an evolving Patch using only the Filter Envelope, Motion Control, and Ribbon Controller. This encourages creative use of performance controls rather than relying on automatic modulation.
Exercise Four: Reverse Engineering
Load one of your favorite factory Patches. Without looking at every parameter immediately, listen carefully and ask:
- Which waveform was probably chosen?
- Is the Filter bright or dark?
- Is movement coming from an LFO or an Envelope?
- Which Effects are most obvious?
Then examine the Patch and compare your observations. This exercise develops critical listening skills that are invaluable for advanced programming.
Chapter Summary
- Recipes teach principles, not just parameter values.
- Begin every Patch with a clear musical objective.
- Follow a consistent programming workflow.
- Understand why each programming decision contributes to the final sound.
- Small adjustments often produce significant musical changes.
- Compare similar sounds to identify recurring design patterns.
- Build your own library of programming notes and successful techniques.
- The goal is to develop your own sound, not simply recreate someone else’s.
Looking Ahead
In Chapter 19, Factory Patch Analysis, we become sound detectives. Instead of creating new Patches from scratch, we will examine representative factory sounds and break them down into their individual programming decisions.
By identifying the Oscillator choices, Filter settings, Envelopes, modulation, Effects, and Performance structure behind these professionally designed sounds, you will learn how experienced Roland programmers approached sound design and how to apply those same concepts to your own creations.