
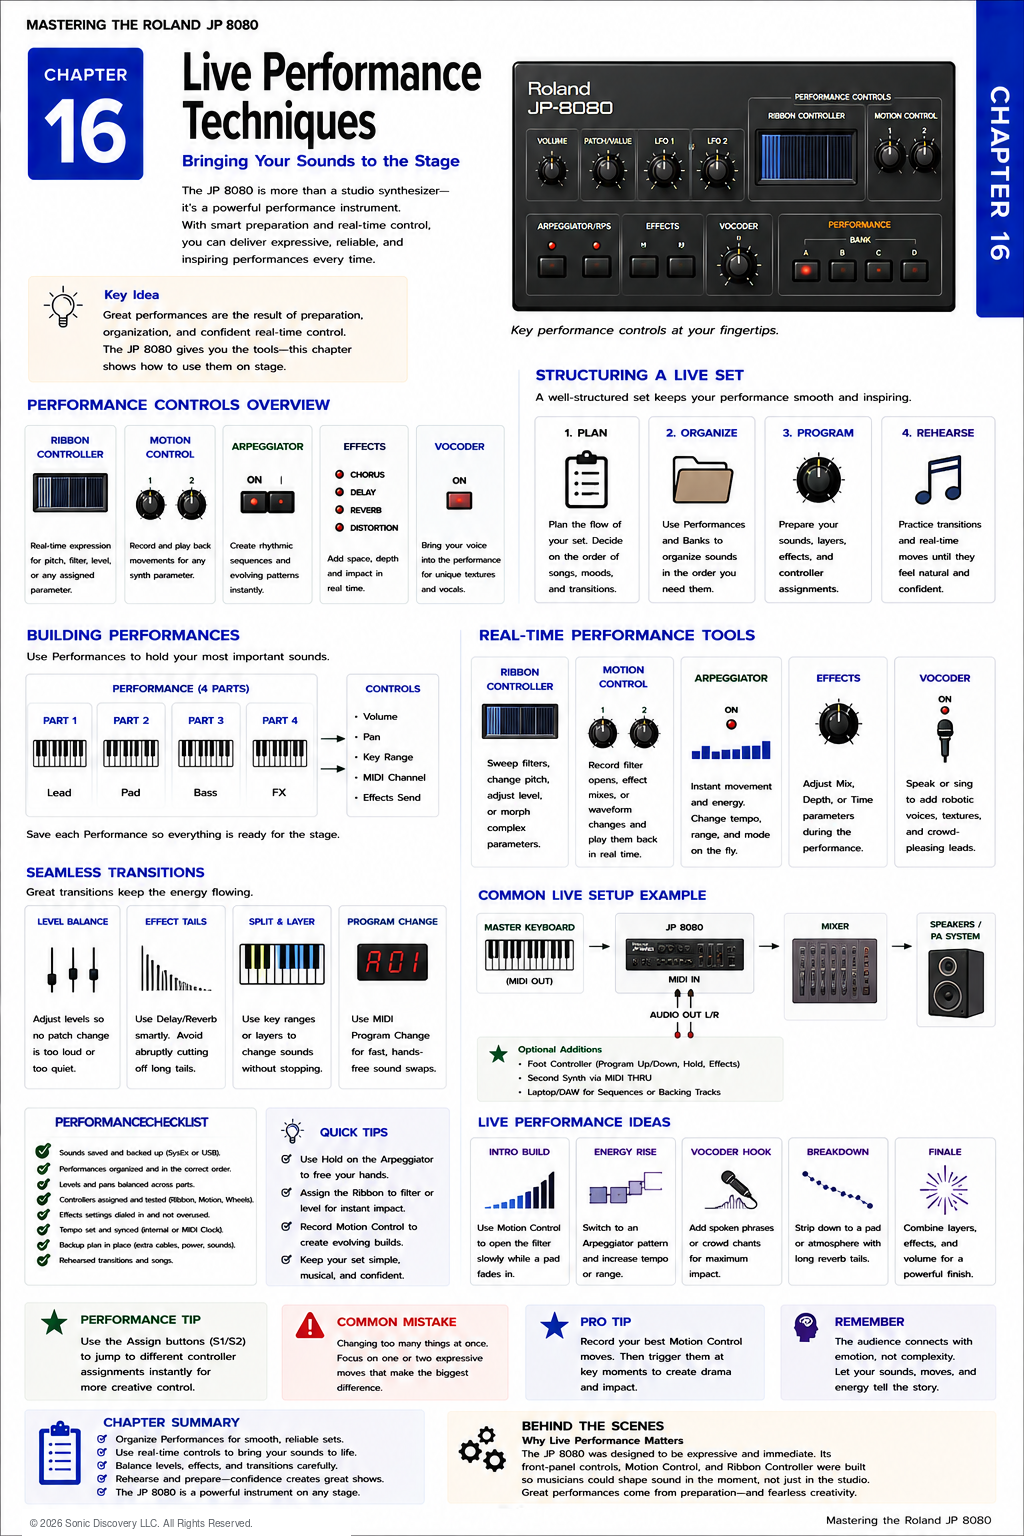
JP-8080 guide / Chapter 16
Live Performance Techniques
Building Performances, seamless transitions, set structure, and stage preparation.
Chapter 16
Programming creates great sounds. Performance brings them to life.
By this point in the handbook, you have learned how to build sounds from the ground up, organize them into Performances, automate movement with Motion Control, perform with the Ribbon Controller, synchronize the Arpeggiator, use onboard effects, and integrate the JP-8080 with MIDI equipment.
Now it is time to put all of those skills together.
A live performance is different from programming in the studio. On stage, you rarely have time to adjust dozens of parameters. Instead, your goal is to create expressive Performances that are easy to recall, reliable under pressure, and flexible enough to adapt to the moment.
The best live performers spend as much time preparing their instrument as they do practicing the music. Preparation creates confidence. Confidence creates better performances.
Think Like a Performer
Many musicians approach live performance as a series of technical tasks. Experienced performers think differently.
Instead of asking, “Which Patch should I load next?” they ask, “How can I move naturally from one musical idea to another?”
This shift in thinking changes how you organize your Performances. Each Performance becomes part of a larger musical journey.
Preparing Your Performance Bank
The User Performance memory is designed specifically for live performance. A good strategy is to organize Performances in the exact order they will be used.
| Performance | Song or purpose |
|---|---|
| U01 | Opening Intro |
| U02 | Song One |
| U03 | Song Two |
| U04 | Ballad |
| U05 | Finale |
This minimizes searching during a performance. The fewer decisions you make on stage, the more you can devote to the audience.
Naming Performances
Clear names are invaluable during a live show. Avoid vague names such as “Lead 3” or “Patch 17.” Instead, use names that immediately identify their purpose.
Useful examples include Intro Pad, Solo Lead, Chorus Stack, Bass Split, Ambient Sweep, and Piano Layer.
A meaningful name reduces hesitation during performance.
Balancing Volume
One of the most common live performance problems is inconsistent volume between sounds. A Lead Patch that sounds perfect in isolation may overpower the mix, while a soft Pad may disappear entirely.
Before every performance:
- Compare all Performances.
- Adjust Patch Levels.
- Check the Upper and Lower balance.
- Verify Effects levels.
- Listen through the same amplification system you will use on stage whenever possible.
Consistency is more important than absolute loudness.
Using Splits and Layers
The JP-8080's Performance mode makes it possible to combine two Patches into one expressive instrument.
| Mode | How it works | Useful applications |
|---|---|---|
| Layer | Upper and Lower Patches play together across the keyboard | Large Pads, Piano with Strings, dual Leads, and rich textures |
| Split | The keyboard is divided into two playing areas | Bass in the Lower area and Lead in the Upper area, allowing one performer to cover multiple roles |
Real Time Performance Controls
The front panel becomes your performance interface. Use it intentionally.
| Control | Best uses | Performance value |
|---|---|---|
| Ribbon Controller | Pitch bends, Filter sweeps, stereo movement, and Effects control | Continuous expression at your fingertips |
| Modulation Wheel | Vibrato, Filter modulation, and expressive dynamics | Introduces controlled movement while playing |
| Pitch Bend Lever | Guitar style bends, vocal phrasing, and Lead solos | Adds natural pitch expression |
| Motion Control | Previously recorded parameter movements | Keeps sustained sounds from feeling static |
Working with the Arpeggiator
The Arpeggiator can become an additional performer. Use it to create rhythmic bass lines, sequenced Pads, dance patterns, and ambient textures.
The Arpeggiator does not replace musical performance. It enhances it. Small adjustments to Gate Time, Tempo, and Octave Range often have a greater musical impact than changing the chord itself.
Using Hold Effectively
The Hold function is especially useful during live performance. Once the Arpeggiator continues automatically, both hands become available.
You can then play another keyboard, operate the Ribbon Controller, adjust Filters, control Effects, or prepare the next musical transition.
Hold transforms the JP-8080 into a highly interactive performance instrument.
Smooth Performance Transitions
One hallmark of experienced performers is that transitions feel effortless.
Before changing Performances:
- Reduce long Delay feedback.
- Allow Reverb tails to fade naturally.
- Complete expressive Ribbon movements.
- Switch sounds confidently.
Planning these small details helps maintain musical continuity.
MIDI on Stage
Many performers integrate the JP-8080 into larger MIDI systems. Typical live setups include a Master Keyboard, hardware sequencer, drum machine, DAW, and additional synthesizers.
Program Change messages can automatically select the correct Performance at exactly the right moment. This eliminates manual sound selection during the show.
Managing Effects Live
Effects that sound exciting in the studio can become overwhelming in a concert hall.
During sound check, listen for excessive Reverb, long Delays, too much Chorus, and Distortion that masks articulation. Adjust Effects to suit the venue because every performance space is different.
Building Reliable Performances
A dependable live setup begins long before the audience arrives.
| Preparation area | Items to prepare |
|---|---|
| Backups | User Patches, User Performances, system settings, and SysEx files |
| Spare equipment | MIDI cables, audio cables, power cables, Sustain Pedal, and Expression Pedal |
Good preparation prevents unnecessary stress.
Practical Examples
| Setup | Programming elements | Result |
|---|---|---|
| Solo Performance | Supersaw Lead on Upper, Bass on Lower, and Ribbon assigned to Filter Cutoff | One keyboard covers melody and accompaniment |
| Ambient Performance | Strings and Pad Layer, Motion Control Filter sweep, and Ribbon assigned to Pan | A continuously evolving atmospheric texture |
| Dance Performance | Arpeggiator enabled, Hold on, Ribbon assigned to Resonance, and tempo synchronized Delay | An interactive electronic performance |
| Progressive Rock Setup | Bass and Lead Split, wide Pitch Bend range, and Modulation Wheel Vibrato | Expressive solo capability without changing instruments |
Listen for It
- Create two versions of the same Performance.
- Give Version One exaggerated Reverb and Delay.
- Give Version Two more conservative settings.
- Play both through speakers at a realistic performance volume.
The second version will often sound clearer and more defined. This is why experienced performers frequently use less processing than expected.
Try It
- Layer a Pad and a Lead.
- Balance their volumes.
- Assign the Ribbon to Filter Cutoff.
- Enable Motion Control on Resonance.
- Activate the Arpeggiator.
- Turn Hold on.
- Practice moving from one Performance to another.
- Save the completed Performance.
Repeat the exercise until switching Performances becomes second nature.
Common Mistake
Many performers create excellent individual Patches but never practice changing between them. A smooth Performance change is a musical skill.
Practice transitions just as carefully as scales or solos. The audience remembers continuity more than technical perfection.
Programming Tip
Arrange your User Performances in the exact order of your set list. Avoid jumping randomly through memory locations during a show.
This simple organizational habit reduces mistakes and allows you to focus entirely on performing.
Behind the Scenes
Why was Performance mode designed this way?
Roland understood that live musicians often need more than individual sounds. A performer may require layered textures, keyboard splits, custom controller assignments, and carefully balanced levels, all instantly available.
Performance mode allows all of these elements to be recalled with a single selection. By storing complete performance environments rather than isolated Patches, the JP-8080 becomes a practical stage instrument capable of handling complex musical situations with minimal preparation during the performance itself.
Creative Performance Ideas
| Performance | Programming elements | Result |
|---|---|---|
| Trance Build | Arpeggiator, Motion Control Filter sweeps, Ribbon controlled Resonance, and tempo synchronized Delay | A dramatic electronic build that grows naturally over time |
| Cinematic Introduction | Layered Strings and Pad, long Hall Reverb, slow Motion Control, and gentle Ribbon Filter movement | A spacious opening texture for film music or live performance |
| Expressive Solo | Lead Patch, wide Pitch Bend, Ribbon assigned to Vibrato Depth, and short Delay | A highly responsive solo instrument |
| One Keyboard Performance | Bass Split, Lead on Upper, Arpeggiator on Lower, and Hold enabled | A complete arrangement performed from a single instrument |
Chapter Summary
- Organize User Performances in set list order.
- Give Performances clear, meaningful names.
- Balance Patch and Performance volumes before every show.
- Use Layers and Splits to maximize flexibility.
- Practice using the Ribbon Controller and Motion Control during actual performances.
- The Arpeggiator and Hold function can free your hands for expressive control.
- Program Change messages simplify live sound selection.
- Adjust Effects for the performance venue rather than relying on studio settings.
- Always back up your work before a performance.
- Careful preparation allows you to concentrate on the music instead of the equipment.
Looking Ahead
In Chapter 17, Studio Programming Workflow, we move from the stage back into the recording studio. Rather than focusing on performance techniques, we explore a structured method for designing professional quality Patches from scratch.
You will learn a repeatable workflow that begins with a musical concept, progresses through oscillator selection, filtering, envelopes, modulation, and effects, and concludes with naming, organizing, and backing up your creations. This systematic approach helps eliminate guesswork and makes sound design faster, more consistent, and more creative.