
JP-8080 guide / Chapter 19
Factory Patch Analysis
A structured method for listening to, analyzing, understanding, and adapting factory sounds.
Chapter 19
Every factory Patch is a lesson in sound design waiting to be discovered.
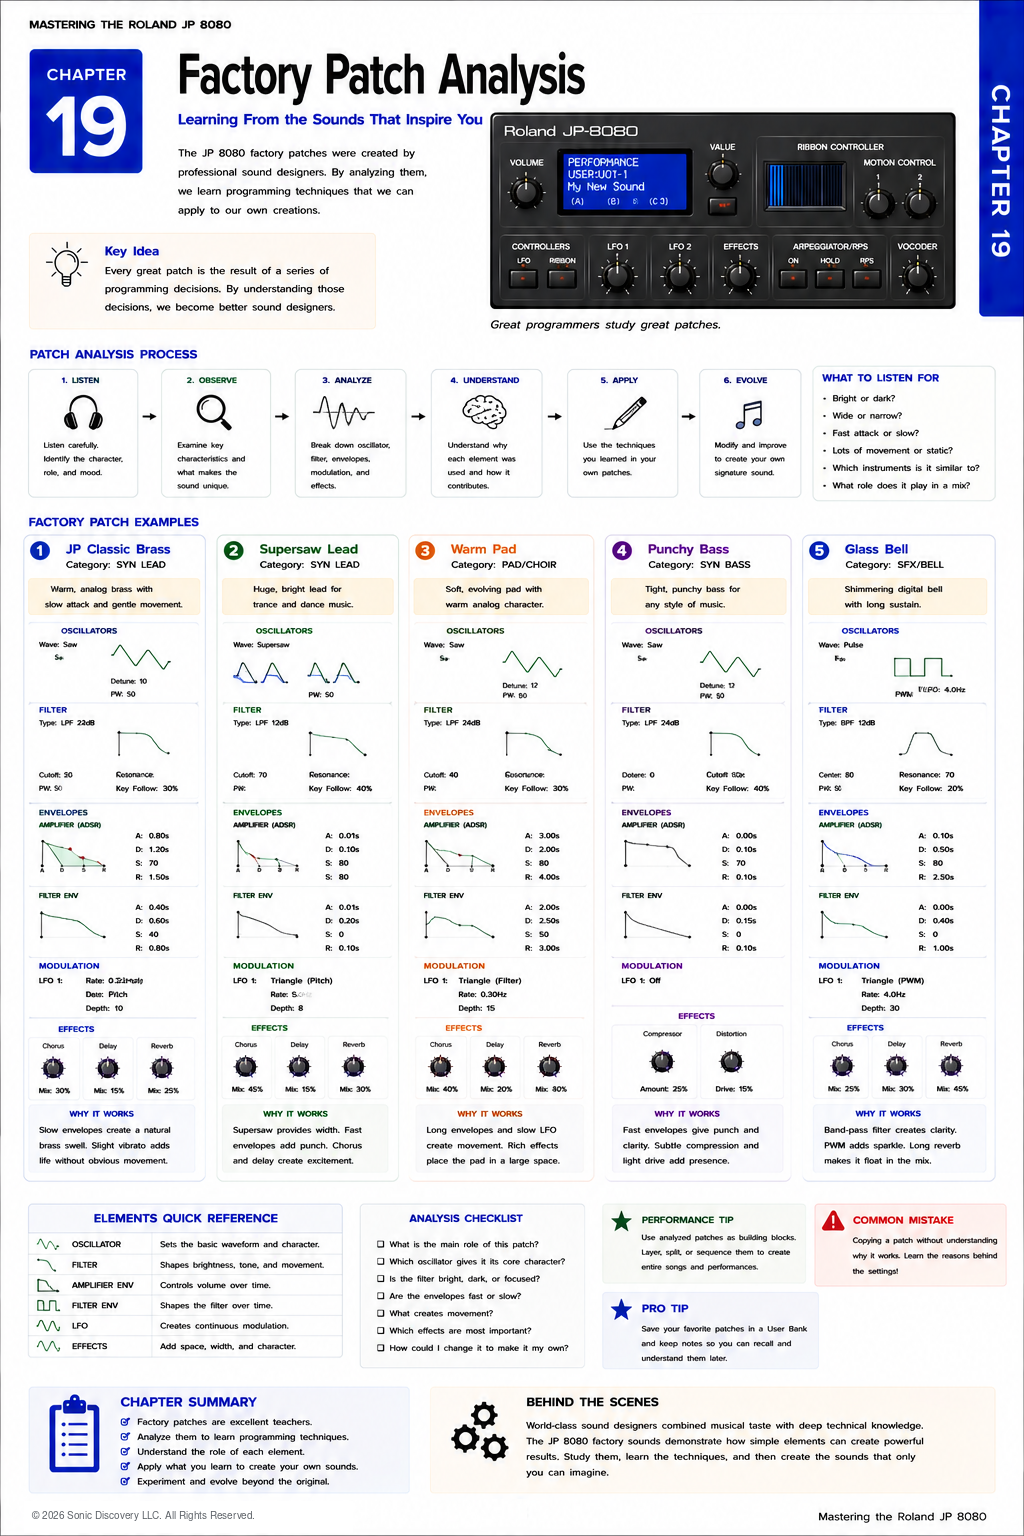
When many musicians first purchase a synthesizer, they immediately begin playing the factory Patches. Some become instant favorites, while others seem too unusual or specialized. It is easy to think of these sounds simply as presets.
In reality, they are much more than that.
Each factory Patch is a carefully designed example created by experienced sound designers to demonstrate a particular programming technique, musical style, or performance concept.
If you learn to analyze these Patches instead of merely playing them, every factory sound becomes a teacher.
This chapter introduces a systematic method for studying factory Patches so you can understand why they sound the way they do and apply those ideas to your own programming.
Factory Patches Are Educational
Roland’s factory sound designers created the JP-8080 demonstrations to showcase the instrument’s capabilities. Each Patch usually emphasizes one or more concepts:
- Oscillator character
- Filter response
- Envelope behavior
- Motion Control
- Ribbon Controller
- Effects processing
- Performance layering
- Arpeggiator programming
- Vocoder applications
Instead of changing every parameter immediately, spend time identifying the primary idea behind the Patch.
Listen Before Looking
One of the best habits a programmer can develop is careful listening. Before examining any parameters, simply play the Patch.
Ask yourself:
- Is it bright or dark?
- Does it respond quickly?
- Is it soft or aggressive?
- Does it move continuously?
- Does it sound wide or narrow?
- Does it sit in the foreground or background?
Your ears should always guide your programming decisions before your eyes.
Break the Sound into Layers
Every Patch can be analyzed in stages. Rather than trying to understand everything at once, divide the sound into individual components.
| Step | Listen for | Questions and clues |
|---|---|---|
| 1. Basic waveform | Saw, Square, Triangle, Noise, Supersaw, or Pulse Width Modulation | The waveform establishes the foundation. |
| 2. Filter | Brightness, darkness, Cutoff, and Resonance | Is the sound naturally bright, or is the Filter removing high frequencies? Does Resonance emphasize certain harmonics? |
| 3. Envelope | Attack, Decay, Sustain, and Release behavior | Does the sound begin immediately, fade in, or continue after you release the key? These clues reveal the Amplifier Envelope. |
| 4. Movement | Pitch, Filter, stereo position, and controller response | Movement may come from an LFO, Motion Control, Ribbon assignments, or Performance controllers. |
| 5. Effects | Chorus, Delay, Reverb, and other processing | Would the Patch change dramatically without Chorus? Does Delay add rhythm? Is Reverb creating space? |
Understanding the source of movement often explains why a Patch feels alive. Effects rarely create the identity of a Patch. Instead, they reinforce what has already been programmed.
Reverse Engineering
Professional programmers often reverse engineer sounds. The process is surprisingly simple:
- Listen.
- Form a hypothesis.
- Check the parameters.
- Revise your understanding.
- Repeat.
For example, you hear gentle vibrato and suspect that a Triangle LFO is assigned to Pitch. You inspect the Patch. If you are correct, your listening skills improve. If you are incorrect, you learn something new. Either outcome develops your programming ability.
Comparing Similar Patches
A particularly valuable exercise is comparing two related factory Patches. Suppose you load a bright Lead and then a warm Lead. Both may use the same waveform.
The difference might come from:
- Filter Cutoff
- Envelope Amount
- Chorus depth
- Delay time
- Resonance
Often only a few carefully chosen adjustments separate two completely different musical personalities.
Performance Analysis
Remember that some factory Performances combine two separate Patches. When analyzing a Performance, ask:
- Which sound is Upper?
- Which sound is Lower?
- Are they layered?
- Are they split?
- Which Patch carries the melody?
- Which Patch supports it?
Many rich factory sounds achieve their character through thoughtful layering rather than complicated individual programming.
Build an Analysis Checklist
The following checklist provides a useful habit whenever you study a new Patch.
| Area | Questions to ask |
|---|---|
| Sound Character | Bright or dark? Warm or cold? Smooth or aggressive? Simple or complex? |
| Oscillator | Which waveform? Is there Detune, Sync, PWM, or Noise? |
| Filter | Where is the Cutoff? How much Resonance, Envelope Amount, and Key Follow? |
| Envelope | Fast or slow Attack? Long Release? Percussive or sustained? |
| Modulation | What is the LFO destination? Is Motion Control, Ribbon, or Velocity response involved? |
| Effects | Is Chorus, Delay, Reverb, Distortion, or Phaser present? |
| Performance | Is the sound layered or split? Which controller assignments are active? |
Following this same checklist develops consistent listening habits.
Practical Analysis Examples
Example One: Bright Trance Lead
Listen carefully. You notice a wide stereo image, bright harmonics, slight vibrato, and tempo synchronized Delay.
From listening alone, you might predict:
- Supersaw
- Low Pass Filter with high Cutoff
- Small Pitch LFO
- Chorus
- Delay
Now inspect the Patch. How close were your observations?
Example Two: Warm Pad
Listen for a long Attack, long Release, gentle movement, and wide stereo image.
You might predict:
- Saw waveform
- Slow Filter Envelope
- Slow Triangle LFO
- Chorus
- Hall Reverb
Again, inspect the Patch and compare.
Example Three: Analog Bass
Listen for an immediate Attack, little Reverb, strong low frequencies, and a punchy beginning.
You might predict:
- Saw waveform
- Fast Filter Envelope
- Minimal Effects
- Short Release
Once again, compare your predictions with the actual programming.
Listen for It
- Choose any factory Patch that you have never used before.
- Without entering Edit mode, spend several minutes simply playing it.
- Experiment with soft notes, loud notes, high octaves, low octaves, chords, and single notes.
- Notice how the Patch responds to your performance.
- Only after forming your own conclusions should you examine the parameters.
This discipline strengthens your ears far more than immediately reading settings from the display.
Try It
- Select three factory Patches: one Lead, one Pad, and one Bass.
- For each Patch, write down your predictions before entering Edit mode.
- Predict the waveform, Filter brightness, Envelope shape, main modulation source, and Effects.
- Compare your notes with the actual programming.
Over time, you will become increasingly accurate.
Common Mistake
Many users immediately begin editing factory Patches without first understanding how they work. As a result, they often lose the qualities that made the original sound successful.
Study first. Experiment second. Save third. Understanding should always come before modification.
Pro Tip
Keep an Analysis Notebook. Whenever a factory Patch impresses you, write down:
- Why you liked it.
- Which programming ideas were new.
- Which techniques you want to reuse.
- Which parameters surprised you.
Eventually, you will build your own personal reference guide based on real observations rather than memory.
Behind the Scenes
How Roland’s factory programmers approached sound design
The original JP-8080 factory library was not assembled randomly. Each Patch was designed to demonstrate a strength of the instrument while remaining musically useful.
Some Patches highlight the famous Supersaw Oscillator. Others emphasize expressive Filter sweeps, evolving Motion Control recordings, or carefully layered Performances. Together, the factory library functions as both a demonstration and a teaching collection.
By studying these sounds systematically, you gain insight into the design philosophy of the programmers who knew the instrument best. You also discover that many memorable sounds rely on thoughtful restraint. A few well chosen programming decisions often create a more effective Patch than dozens of dramatic changes.
Creative Programming Exercises
Exercise One: Find the Foundation
Load five factory Patches. Without looking at the display, identify the likely Oscillator waveform by ear. Then verify your answer in Edit mode.
Exercise Two: Effects Detective
Choose a factory Patch and disable one Effect at a time. Listen carefully after each change.
- What changed?
- What remained the same?
- Which Effect contributed the most?
Exercise Three: Envelope Detective
Find a factory Pad and measure how long it takes to reach full volume. Then compare it with a factory Lead. Notice how Envelope timing alone changes the musical role of the sound.
Exercise Four: Create a Variation
Choose one favorite factory Patch. Rather than redesigning it completely, make only three deliberate changes.
Examples include a slightly darker Filter, slower LFO, or less Chorus. Save the result under a new name.
This exercise teaches controlled refinement instead of random experimentation.
Chapter Summary
- Factory Patches are excellent learning tools.
- Listen before examining parameters.
- Analyze sounds one section at a time.
- Build hypotheses before entering Edit mode.
- Compare similar Patches to identify important programming differences.
- Study both individual Patches and complete Performances.
- Keep written notes of successful programming techniques.
- Small differences often produce major musical changes.
- Understanding programming decisions is more valuable than memorizing settings.
Looking Ahead
In Chapter 20, Troubleshooting, we will examine the most common questions and problems encountered by JP-8080 owners.
You will learn systematic methods for diagnosing unexpected behavior, recovering from programming mistakes, resolving MIDI communication issues, understanding memory related problems, and restoring normal operation.
Rather than relying on trial and error, you will develop a logical troubleshooting process that saves time and increases your confidence whenever something does not behave as expected.