
JP-8080 guide / Chapter 24
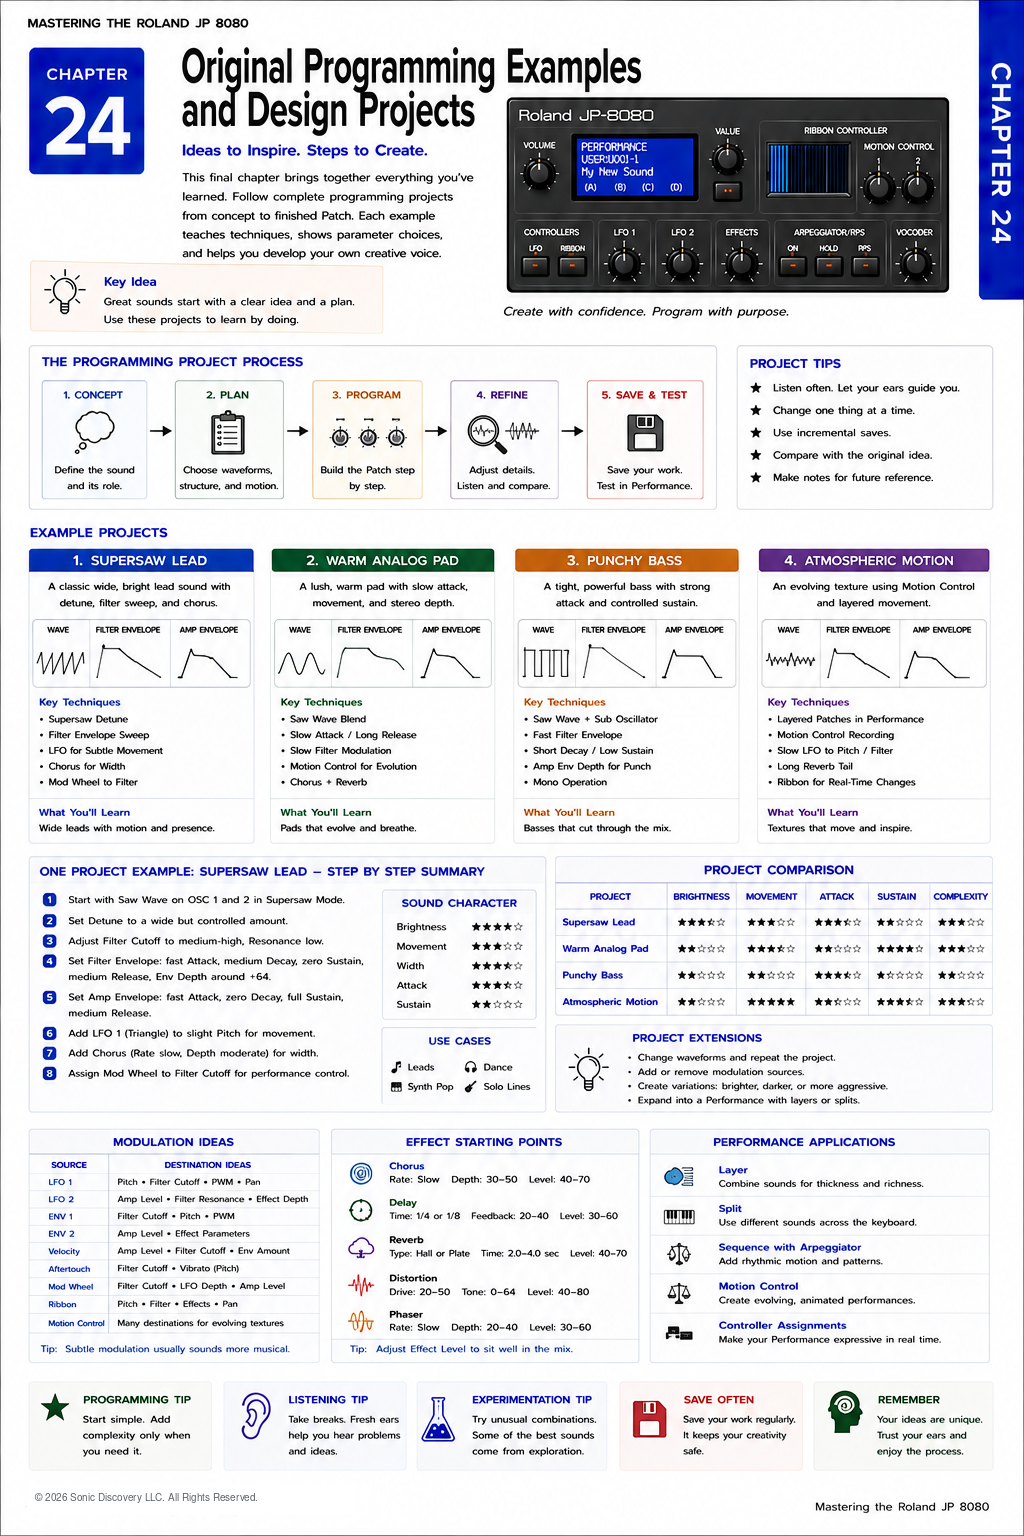
Original Programming Examples and Design Projects
Complete sound design projects, comparisons, modulation ideas, effect starting points, and performance applications.
Chapter 24
Knowledge becomes skill only when it is applied.
Throughout this handbook, you have explored every major system inside the Roland JP-8080. You have learned how Oscillators generate sound, how Filters shape harmonic content, how Envelopes define expression, how LFOs create movement, and how Motion Control, the Ribbon Controller, Effects, Performances, MIDI, and SysEx work together.
Now it is time to put everything into practice.
This chapter is different from the Programming Recipes in Chapter 18. Those recipes introduced sound design concepts through guided examples. The projects in this chapter simulate real world programming sessions.
Each project begins with a musical objective and follows the complete design process from an initialized Patch to a finished sound.
The goal is not simply to reproduce the examples. It is to develop a structured way of thinking that you can apply to every new sound you create.
The Sound Design Workflow
Before beginning any project, follow the same programming sequence:
- Define the musical concept.
- Choose the waveform.
- Balance the Oscillators.
- Shape the sound with the Filter.
- Program the Envelopes.
- Add modulation.
- Apply Effects.
- Test the Patch across the keyboard.
- Save the Patch.
- Create a SysEx backup.
Following the same workflow every time builds consistency and reduces programming mistakes.
Project One: Modern Trance Anthem Lead
Musical Goal
Create a powerful lead that cuts through a dense electronic mix while remaining expressive during solos.
Step One: Establish the Oscillator
Initialize a Patch. Begin with the Supersaw waveform and keep Detune moderate. Too much Detune can reduce focus.
Step Two: Shape the Filter
Open the Filter enough to preserve brightness. Add only a small amount of Resonance.
Step Three: Set the Envelope
Program a fast Attack and medium Release. The lead should respond instantly while allowing smooth transitions between notes.
Step Four: Add Pitch Movement
Assign a gentle LFO to Pitch. Keep the depth subtle. The vibrato should enhance expression without sounding artificial.
Step Five: Add Effects
Add Chorus, synchronized Delay, and Hall Reverb. Balance each Effect carefully. The lead should sound larger, not washed out.
What You Learned
- Build around the Oscillator.
- Use restraint with Detune.
- Create width through Effects rather than excessive modulation.
- Maintain clarity in a mix.
Project Two: Cinematic Motion Pad
Musical Goal
Create a slowly evolving atmospheric pad suitable for film scoring and ambient music.
Oscillator
- Supersaw
- Moderate Detune
Filter
- Medium Cutoff
- Gentle Resonance
Envelope
- Long Attack
- Long Release
Motion
Record slow Filter movement using Motion Control. Assign the Ribbon Controller to Resonance.
Effects
- Wide Chorus
- Long Hall Reverb
- Light Delay
Test
Play sustained four note chords. Listen for gradual evolution rather than dramatic changes.
What You Learned
- Slow movement creates emotional depth.
- Multiple subtle modulations are more effective than one exaggerated modulation.
- Motion Control can replace repetitive manual performance.
Project Three: Vintage Analog Brass
Musical Goal
Recreate the expressive brass synthesizer sounds heard throughout the 1980s.
Oscillator
- Saw waveform
- Minimal Detune
Filter
- Moderately closed Low Pass Filter
- Positive Filter Envelope Amount
Envelope
- Fast Attack
- Medium Decay
- Moderate Sustain
- Medium Release
Performance Technique
Play short chords with varying keyboard velocity.
Effects
- Light Chorus
- Small Room Reverb
What You Learned
- Envelope timing is critical.
- Velocity dramatically improves realism.
- Brass relies more on articulation than Effects.
Project Four: Expressive Solo Performance
Musical Goal
Build a complete Performance suitable for live performance.
Upper Part
Use a bright Lead.
Lower Part
Use a warm Pad.
Layer
Balance both sounds carefully. The Pad should support rather than overpower the Lead.
Ribbon
Assign the Ribbon Controller to Filter Cutoff.
Modulation Lever
Assign the Modulation Lever to Pitch Vibrato.
Motion Control
Record gradual Filter movement.
Effects
Apply only enough processing to enhance both sounds.
Performance Test
Test the Performance with:
- Sustained melodies
- Fast passages
- Soft dynamics
- Loud dynamics
Confirm that the Performance remains expressive under every playing style.
What You Learned
- Effective layering
- Controller assignments
- Live performance optimization
- Performance balancing
Project Five: Classic Analog Bass
Musical Goal
Create a tight, focused bass that supports the rhythm section without overwhelming the mix.
Oscillator
- Saw waveform
- Sub Oscillator added sparingly
Filter
- Lower Cutoff
- Very little Resonance
Envelope
- Immediate Attack
- Short Decay
- Medium Sustain
- Short Release
Effects
- Minimal Distortion
- No Reverb
Test
Play repeated eighth notes. The bass should remain punchy and clearly defined.
What You Learned
- Simplicity often produces stronger bass sounds.
- Short Releases improve rhythmic precision.
- Excessive Effects reduce low frequency clarity.
Project Six: Designing Your Own Signature Patch
Every experienced programmer eventually develops recognizable characteristics. Now create a Patch that reflects your own musical identity.
Begin by answering these questions.
What emotion should the sound communicate?
- Powerful
- Warm
- Mysterious
- Aggressive
- Peaceful
- Energetic
Where will the sound be used?
- Live performance
- Studio recording
- Film music
- Electronic dance music
- Ambient composition
These decisions guide every programming choice that follows.
Building a Personal Workflow
As your programming experience grows, develop your own checklist.
- Musical objective defined
- Waveform selected
- Oscillators balanced
- Filter adjusted
- Envelope refined
- LFO programmed
- Motion Control tested
- Ribbon assigned
- Effects balanced
- Performance tested
- Patch saved
- SysEx backup created
Eventually this workflow becomes second nature.
Listen For It
Choose one of the projects in this chapter and play it for several minutes. Then mute one programming section.
Examples include:
- Disable Chorus.
- Disable Motion Control.
- Disable the LFO.
- Raise the Filter Cutoff completely.
Notice how removing a single element changes the overall personality of the sound. Understanding these relationships is the foundation of confident sound design.
Try It
Create three variations of the same Patch:
- Design Version One for headphones.
- Design Version Two for studio monitors.
- Design Version Three for live stage performance.
Compare how small programming adjustments improve the Patch for different listening environments.
Common Mistake
Trying to perfect a sound before finishing it.
Many programmers spend an hour adjusting the Filter before deciding on the waveform.
Instead, finish the complete Patch and then refine it. Working from the broadest decisions toward the smallest details is both faster and more effective.
Pro Tip
When you finish a Patch, leave it alone for a day.
The next time you hear it, ask yourself three questions:
- Does it still achieve the original musical goal?
- Is anything distracting?
- Could one small improvement make it better?
Fresh listening often reveals details that were difficult to notice during programming.
Behind the Scenes
Developing Your Own Programming Style
The most memorable synthesizer sounds are rarely the result of complicated programming. More often, they are the result of consistent artistic decisions.
Some designers naturally create warm, evolving textures. Others prefer sharp, energetic leads or deep, controlled basses. Over time, these preferences become a recognizable signature.
The JP-8080 provides the flexibility to support all of these approaches. The more sounds you create, analyze, revise, and compare, the more clearly your own programming style will emerge.
Rather than asking how another programmer would design a sound, begin asking how you want it to sound. That shift from imitation to creative intent marks the transition from learning synthesis to practicing it as an art.
Final Creative Challenge
Build an Original Sound Library
Create ten completely original Patches. Include at least one from each category:
- Bass
- Lead
- Pad
- Brass
- String
- Pluck
- Atmospheric texture
- Motion Control sound
- Performance layer
- Experimental sound
For each Patch, document:
- Musical objective
- Main waveform
- Filter approach
- Envelope strategy
- Modulation sources
- Effects
- Programming lessons learned
When finished, organize the sounds into User memory and create a complete SysEx backup. This project represents the culmination of everything covered in this handbook.
A Programmer's Mindset
The Roland JP-8080 rewards experimentation, patience, and careful listening.
Great sounds are rarely discovered by accident. They are built through observation, refinement, and purposeful decision making.
Every adjustment should support a musical objective. Every saved Patch should teach you something new. Every programming session should expand your understanding of synthesis.
If you adopt this mindset, the JP-8080 becomes more than a synthesizer. It becomes a creative instrument that continues to reveal new possibilities for years to come.
Final Handbook Summary
You have now explored:
- The architecture of the JP-8080
- Patch and Performance programming
- Oscillators and the Supersaw engine
- Filters and Envelopes
- LFOs and Motion Control
- Ribbon Controller performance techniques
- Effects processing
- MIDI implementation
- Studio and live workflows
- Programming recipes
- Factory Patch analysis
- Troubleshooting
- SysEx backup and restoration
- Hidden programming techniques
- Complete parameter reference
- Full programming projects
Taken together, these chapters provide a structured path from beginner to confident programmer. More importantly, they encourage a way of thinking about synthesis that emphasizes listening, experimentation, and understanding rather than memorization.
Final Thoughts
When Roland introduced the JP-8080, it quickly became one of the defining virtual analog synthesizers of its era. Decades later, it remains valued not only for its distinctive sound, but also for its hands on interface that invites exploration.
The knowledge in this handbook is intended to help you move beyond simply selecting presets. As you continue programming, remember that every memorable Patch begins with a clear musical idea and evolves through deliberate choices.
The techniques presented here are not rules, but tools. Use them, adapt them, and refine them until they become part of your own creative process.
Your most rewarding sounds are still waiting to be created.