
JP-8080 guide / Chapter 23
Complete Parameter Reference
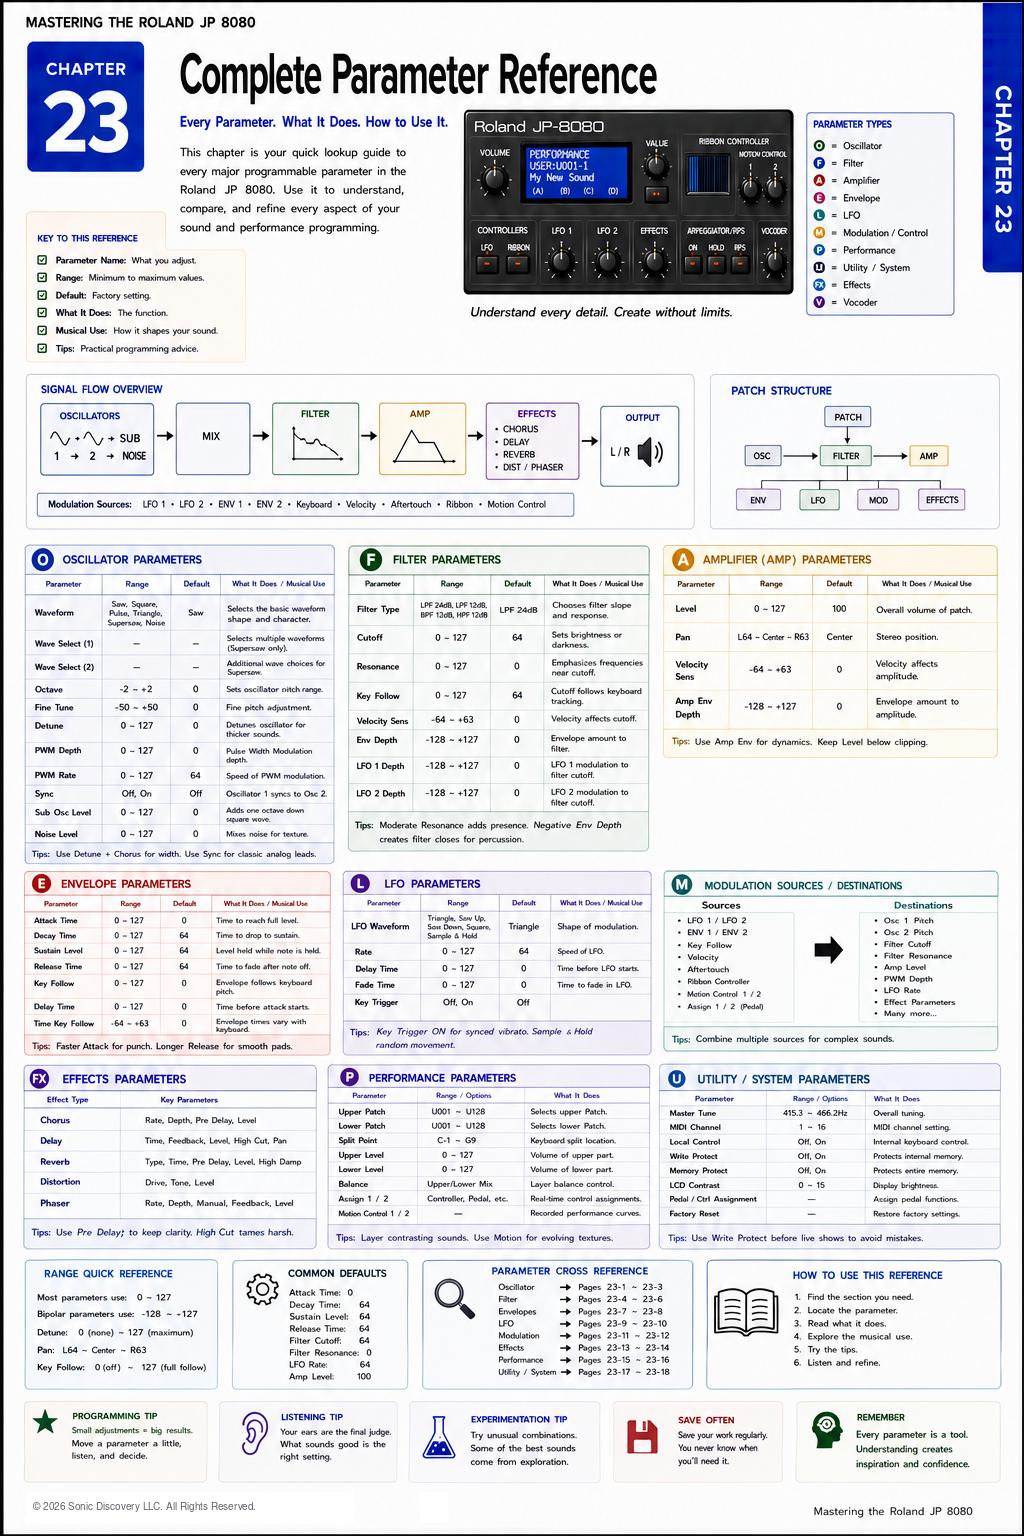
A visual lookup guide to the major oscillator, filter, amp, envelope, LFO, effects, Performance, and system parameters.
Chapter 23
A synthesizer becomes intuitive when every control has a clear purpose.
Throughout this handbook, you have learned how each section of the Roland JP-8080 contributes to the creation of a sound. This chapter serves as a practical reference guide that you can return to whenever you need a quick explanation of a parameter or want to understand how a particular control affects your programming.
Unlike a service manual or technical specification, this reference focuses on musical application rather than engineering details. Instead of simply describing what a parameter does, it explains why you would adjust it, what you should listen for, and how it interacts with other controls.
Think of this chapter as your programming companion.
Oscillator Parameters
The Oscillator is the starting point of every Patch. Without an Oscillator, there is no sound to shape.
Waveform
Purpose: Selects the basic sound source.
Typical Use: Choose the waveform that best matches your musical goal.
Listen For: Changes in harmonic content and overall character.
Programming Tip: Start with the waveform that naturally sounds closest to your target sound. This reduces the amount of filtering required later.
Pitch
Purpose: Determines the oscillator's tuning.
Typical Use: Set the correct musical register.
Listen For: Changes in note height.
Programming Tip: Small tuning differences between oscillators create width and richness.
Fine Tune
Purpose: Makes small pitch adjustments.
Typical Use: Create slight detuning between oscillators.
Listen For: A thicker, wider sound.
Programming Tip: Very small adjustments often sound more natural than extreme detuning.
Detune
Purpose: Controls the spread of multiple oscillators in Supersaw mode.
Typical Use: Create wide, layered sounds.
Listen For: Increasing width and movement.
Programming Tip: Too much detune can reduce clarity in a dense mix.
Pulse Width
Purpose: Changes the duty cycle of a square waveform.
Typical Use: Vintage analog leads and evolving textures.
Listen For: Changing harmonic richness without changing pitch.
Programming Tip: Pulse Width becomes especially expressive when modulated by an LFO.
Oscillator Sync
Purpose: Synchronizes one oscillator to another.
Typical Use: Aggressive leads and expressive solos.
Listen For: Bright, harmonically rich sweeps.
Programming Tip: Oscillator Sync is most effective when combined with envelope modulation.
Noise Level
Purpose: Adds broadband noise to the signal.
Typical Use: Percussion, breath sounds, wind effects, and attack transients.
Listen For: Texture rather than pitch.
Programming Tip: A small amount of noise often adds realism to acoustic style sounds.
Mixer Parameters
The Mixer determines how the available sound sources combine before entering the Filter.
Oscillator Balance
Purpose: Controls the relative levels of the oscillators.
Typical Use: Blend complementary sound sources.
Listen For: Changes in tonal emphasis.
Programming Tip: A balanced mix generally produces a stronger sound than maximizing every source.
Sub Oscillator Level
Purpose: Adjusts the level of the Sub Oscillator.
Typical Use: Strengthen bass frequencies.
Listen For: Additional low frequency weight.
Programming Tip: Too much Sub Oscillator can overwhelm the mix.
Filter Parameters
The Filter shapes the harmonic content of the Oscillator. Many musicians consider it the most expressive section of the synthesizer.
Filter Type
Purpose: Determines how frequencies are processed.
Typical Use: Choose the overall tonal character.
Listen For: Changes in brightness and tonal shape.
Programming Tip: Low Pass filters are the foundation of most subtractive synthesis.
Cutoff Frequency
Purpose: Sets the point where the Filter begins reducing frequencies.
Typical Use: Brighten or darken a sound.
Listen For: The amount of high frequency content.
Programming Tip: Small adjustments often have a greater musical effect than large movements.
Resonance
Purpose: Boosts frequencies around the Cutoff point.
Typical Use: Create emphasis and character.
Listen For: A pronounced peak near the Filter frequency.
Programming Tip: Moderate Resonance usually produces the most musical results.
Key Follow
Purpose: Changes the Filter according to keyboard position.
Typical Use: Maintain consistent brightness across the keyboard.
Listen For: High notes remaining balanced instead of becoming dull.
Programming Tip: Full Key Follow is not always desirable. Adjust it according to the musical goal.
Filter Envelope Amount
Purpose: Determines how strongly the Filter Envelope affects the Cutoff.
Typical Use: Add dynamic brightness changes.
Listen For: Movement at the beginning and throughout each note.
Programming Tip: Envelope Amount often contributes more personality than Resonance alone.
Amplifier Parameters
The Amplifier controls volume over time.
Level
Purpose: Sets the overall Patch volume.
Typical Use: Balance Patches within a Performance.
Listen For: Consistent output level.
Programming Tip: Avoid creating Patches that are dramatically louder than others.
Pan
Purpose: Positions the sound within the stereo image.
Typical Use: Create width in layered Performances.
Listen For: Movement between the left and right speakers.
Programming Tip: Extreme panning is usually most effective when layering multiple sounds.
Envelope Parameters
The JP-8080 uses ADSR envelopes to shape both volume and Filter behavior.
Attack
Purpose: Controls how quickly the sound reaches full level.
Typical Use: Fast attacks for leads and basses. Slow attacks for pads and strings.
Listen For: The beginning of each note.
Decay
Purpose: Controls how quickly the sound falls from the Attack peak to the Sustain level.
Typical Use: Brass, plucked sounds, and percussive textures.
Listen For: The transition immediately after the initial Attack.
Sustain
Purpose: Determines the level held while the key remains pressed.
Typical Use: High values for sustained sounds. Lower values for percussive sounds.
Listen For: The body of the note.
Release
Purpose: Determines how long the sound continues after releasing the key.
Typical Use: Short releases for basses. Long releases for ambient pads.
Listen For: The end of the note.
Programming Tip: Release should complement the musical tempo rather than blur it.
LFO Parameters
The Low Frequency Oscillator introduces repeating movement.
Waveform
Purpose: Determines the modulation shape.
Typical Use: Triangle for smooth movement. Square for abrupt changes. Random for evolving textures.
Listen For: The character of the modulation.
Rate
Purpose: Controls modulation speed.
Typical Use: Slow for pads. Fast for vibrato and rhythmic effects.
Listen For: The speed of movement.
Depth
Purpose: Determines modulation intensity.
Typical Use: Gentle vibrato or dramatic sweeps.
Listen For: How noticeable the movement becomes.
Programming Tip: Subtle depth often sounds more musical than maximum settings.
Motion Control Parameters
Record
Purpose: Captures front panel movements.
Typical Use: Automate Filter sweeps and evolving sounds.
Listen For: Repeated control movements during playback.
Playback
Purpose: Reproduces recorded Motion data.
Typical Use: Animated textures and evolving Performances.
Programming Tip: Slow movements generally sound more natural than rapid gestures.
Ribbon Controller Parameters
Destination
Purpose: Selects which parameter the Ribbon controls.
Typical Use: Filter, Pitch, Effects, or other expressive destinations.
Listen For: Real time changes while touching the Ribbon.
Depth
Purpose: Controls the amount of Ribbon influence.
Typical Use: Fine expressive control.
Programming Tip: Small depth values provide more precise performance control.
Effects Parameters
The Effects section enhances the finished Patch.
Chorus
Purpose: Creates width and richness.
Best For: Pads, strings, and Supersaw leads.
Delay
Purpose: Repeats the signal over time.
Best For: Leads, arpeggios, and ambient textures.
Reverb
Purpose: Creates the impression of acoustic space.
Best For: Pads, solo sounds, and atmospheric textures.
Distortion
Purpose: Adds harmonic saturation.
Best For: Aggressive leads, industrial sounds, and bass.
Phaser
Purpose: Creates moving phase cancellations.
Best For: Vintage analog textures and evolving pads.
Performance Parameters
Upper Patch
Purpose: Selects the Patch assigned to the Upper Part.
Lower Patch
Purpose: Selects the Patch assigned to the Lower Part.
Split Point
Purpose: Determines where the keyboard divides.
Layer Balance
Purpose: Controls the volume relationship between the Upper and Lower Parts.
Performance Controllers
Purpose: Assigns controller behavior for the complete Performance.
Utility Parameters
Master Tune
Purpose: Adjusts the overall tuning of the synthesizer.
MIDI Channel
Purpose: Determines the MIDI communication channel.
Local Control
Purpose: Connects or disconnects the keyboard from the internal sound engine.
Typical Use: Enable it during normal playing. Disable it when using a DAW that echoes MIDI back to the instrument.
Memory Protect
Purpose: Prevents accidental overwriting of User memory.
Programming Tip: Enable Memory Protect before live performances if you do not intend to edit sounds.
Understanding Parameter Interaction
One of the most important lessons in synthesis is that parameters rarely work in isolation.
For example:
- Increasing Filter Cutoff may require reducing Resonance.
- Longer Release times often require less Reverb.
- More Supersaw Detune may require less Chorus.
- Faster LFO Rates may require reduced Depth.
- Higher Oscillator Levels may require lower Effect Levels to avoid clipping.
Experienced programmers think in terms of relationships rather than individual settings.
Listen For It
Choose one parameter from each major section of the synthesizer:
- Oscillator
- Filter
- Envelope
- LFO
- Effects
Adjust only that parameter while leaving all others unchanged. Listen carefully to how each section contributes to the final sound.
This exercise builds a clear mental connection between the control and the musical result.
Try It
Load one of your favorite User Patches. Make one subtle adjustment in each section:
- Slightly increase Fine Tune.
- Lower the Filter Cutoff a small amount.
- Lengthen the Amplifier Release.
- Reduce LFO Depth.
- Lower the Chorus Level.
Play the Patch after each change. Notice how a series of small refinements can produce a noticeably different musical character without fundamentally changing the sound.
Common Mistake
Trying to solve every programming problem by adjusting a single parameter.
For example, if a Patch sounds harsh, immediately lowering the Filter Cutoff may not be the best solution. The harshness could instead come from excessive Resonance, too much Distortion, excessive Detune, or an overly bright waveform.
Always consider how the different sections interact before making large adjustments.
Pro Tip
When learning a new parameter, exaggerate it first.
Turn the control well beyond what you would normally use so you can clearly hear its effect. Once you understand what it does, return to more moderate settings.
This approach makes it much easier to recognize the parameter's contribution during everyday programming.
Behind the Scenes
Why are there so many parameters?
The JP-8080 was designed to provide immediate access to the most important elements of subtractive synthesis. Instead of hiding functions inside deep menus, Roland placed dedicated controls on the front panel so programmers could explore sound through direct interaction.
Although the number of controls may seem intimidating at first, they represent a relatively small set of concepts used in countless combinations. Once you understand the role of each section and how they interact, programming becomes less about memorizing parameters and more about translating musical ideas into sound.
Quick Reference Workflow
When creating a new Patch, use this sequence as your guide.
- Define the musical idea.
- Select the Oscillators.
- Balance the Mixer.
- Shape the Filter.
- Set the Envelope timing.
- Add LFO movement.
- Record Motion Control if needed.
- Assign the Ribbon Controller.
- Add Effects.
- Integrate the Patch into a Performance.
- Save and back up the result.
Chapter Summary
- Every parameter serves a musical purpose.
- Learn the sound of each control before memorizing its value.
- Think in terms of parameter relationships rather than isolated settings.
- Small adjustments often produce the most musical results.
- Build a strong Patch before relying on Effects.
- Use this chapter as a quick reference whenever you encounter an unfamiliar parameter.
- Trust your ears first and the numbers second.
- Consistent practice transforms technical knowledge into musical intuition.